Exit strategies in trading involve a range of actions traders take to protect their capital from losses. Since losses are inherent to the profession, developing an exit strategy involves finding, achieving, and maintaining an optimal balance where losses are offset by profits.
This article will delve into the tools for implementing exit strategies available in the ATAS platform.
Contents:
Types of Exit Strategies
Developing an exit strategy depends on financial goals, the trading system used, experience, the trader’s individual preferences, and other factors.
The following types of exit strategies are available to traders and investors:
- Diversification. Allocating capital among various assets (and/or trading systems) aims to reduce risk since negative changes in one area can be offset by positive changes in another.
- Position sizing management helps control risk by limiting the size of each position according to the overall trading capital. For example, a trader with a $10,000 capital may open each position with a volume of $500.
- Using options and futures. These derivative instruments (including hedging) can be used for more advanced exit strategies. For instance, to protect a long position in futures, a trader may decide to purchase a put option, which insures against potential price declines.
- Psychological preparation. To minimize the risk of making impulsive decisions, traders are encouraged to develop detailed trading plans, learn to manage emotions, extend timeframes (allowing more time for analysis), use clearer indicators, and practice trading in a simulator.
However, the most obvious and common way to protect your capital is by setting stop-loss and take-profit orders:
- stop-loss is an order to close a position automatically when the price reaches a specific level, preventing further losses.
- take-profit is an order that closes a position when the price reaches a predetermined profit level. The execution of the take-profit order cancels the stop-loss order: the higher the probability of the take-profit order being triggered, the lower the probability of the protective stop-loss order being triggered.
Before we delve into describing ATAS functionality for managing stop-losses and take-profits, let’s highlight some important drawing tools that help you plan position openings in a proficient and visually easy way.
These tools are called Long (planning to buy positions) and Short (planning to sell positions) and can be found in the drawing objects menu (1). They can also be placed on the left panel (2) for quick access.

The screenshot displays a red-green construction created using the Long tool, consisting of two rectangles, which will:
- visually demonstrate the risk-reward ratio based on the levels at which the trader plans to set SL and TP;
- calculate the position size based on the specified percentage of allowable risk.
More details about the Long and Short tools can be found on the respective page in the Knowledge Base. Now, let’s focus on the exit strategies block located on the Chart Trader panel (to access it, press ‘T’).
Capabilities of the ATAS Exit Strategies Block
The ATAS platform is constantly evolving. In its current configuration, users have access to a user-friendly and functional exit strategies block:

The block consists of two tabs (1):
- the SL/TP tab has functionality for working with stop-loss and take-profit orders;
- the Advanced tab provides options for setting take-profit and stop-loss orders not for the entire position, but for its parts, offering more flexibility in capital management.
On the SL/TP tab, you will find:
- settings (2) for placing fixed stop-loss and/or take-profit orders;
- settings (3) for transitioning a position to breakeven;
- settings (4) for a trailing stop-loss.
The Advanced tab will be discussed further in the text. For now, let’s focus on examples of using the functionality that has already been introduced.
Fixed SL and/or TP Strategy
This is the easiest strategy where a trader has well-defined rules (logic) for placing stop-loss and take-profit orders.
For instance, if a trader has opened a long position on BTC/USD, they can set fixed values for SL and TP using either:
- a functional marker on the chart;
- the exit strategies block.
Option 1. If you look at the marker reflecting data about an open position near the price scale on the chart, you will see buttons for SL and TP. By dragging them to the desired price levels, you can set levels of acceptable risk and acceptable profit.
- Pros: visual, convenient, simple.
- Cons: there is a risk of making a human error: accidentally placing an order at the wrong level or not doing it quickly enough. Or forgetting about it.
Option 2. Let’s use the exit strategies block on the Chart Trader panel.
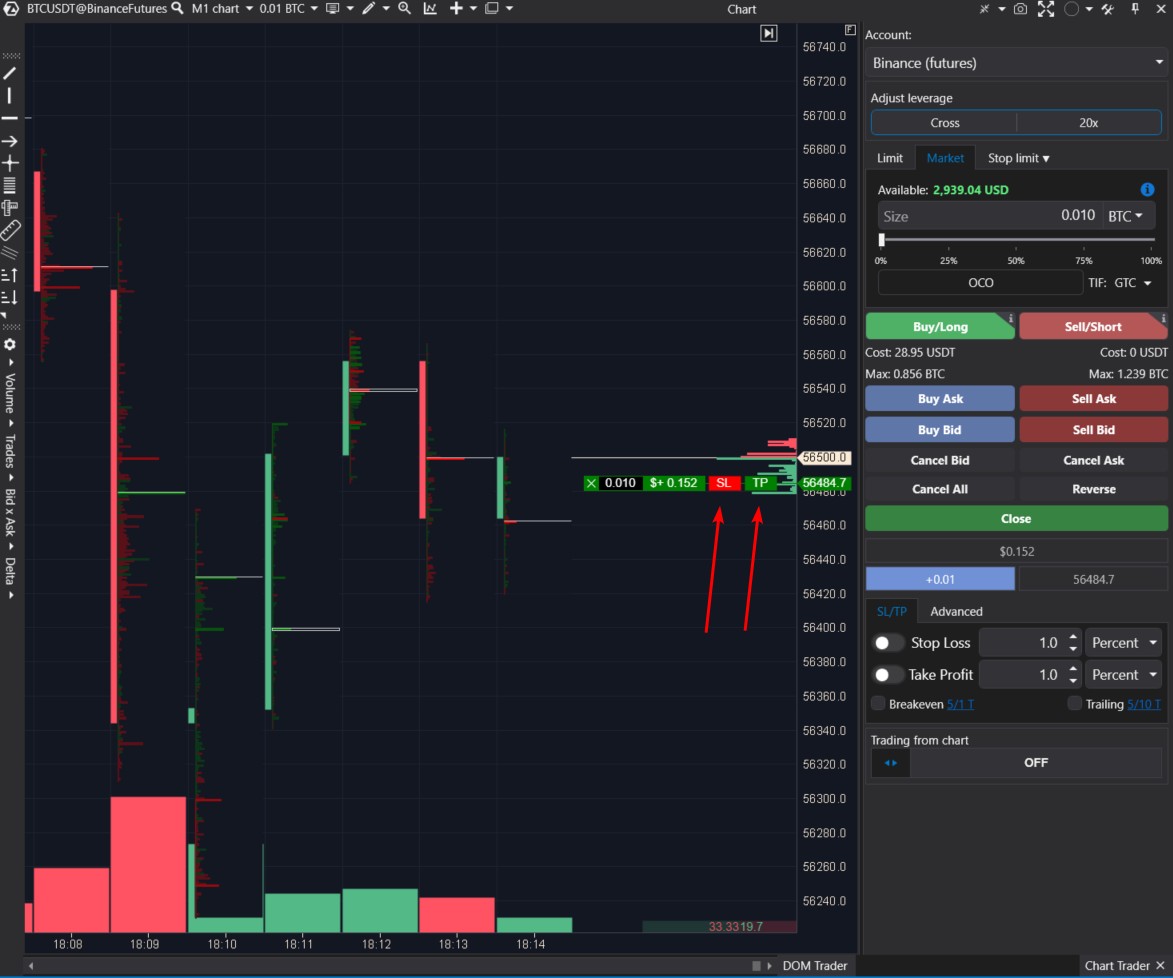
For example, you want to set a protective stop order 0.1% below the current price immediately after opening a position. To do this:
- activate the Stop-Loss slider;
- in the settings, specify the distance = 0.1% (you can set it in percentages, ticks, or currency – rounding in calculations is acceptable);
- click Apply to use the settings;
- open a position.
In the screenshot above, we see the BTC/USDT market, data from the Binance futures exchange. We observe the result – the stop-loss was automatically set higher immediately after opening a short position.
If the position is closed when the take-profit is reached or manually, the existing stop-loss will be automatically canceled.
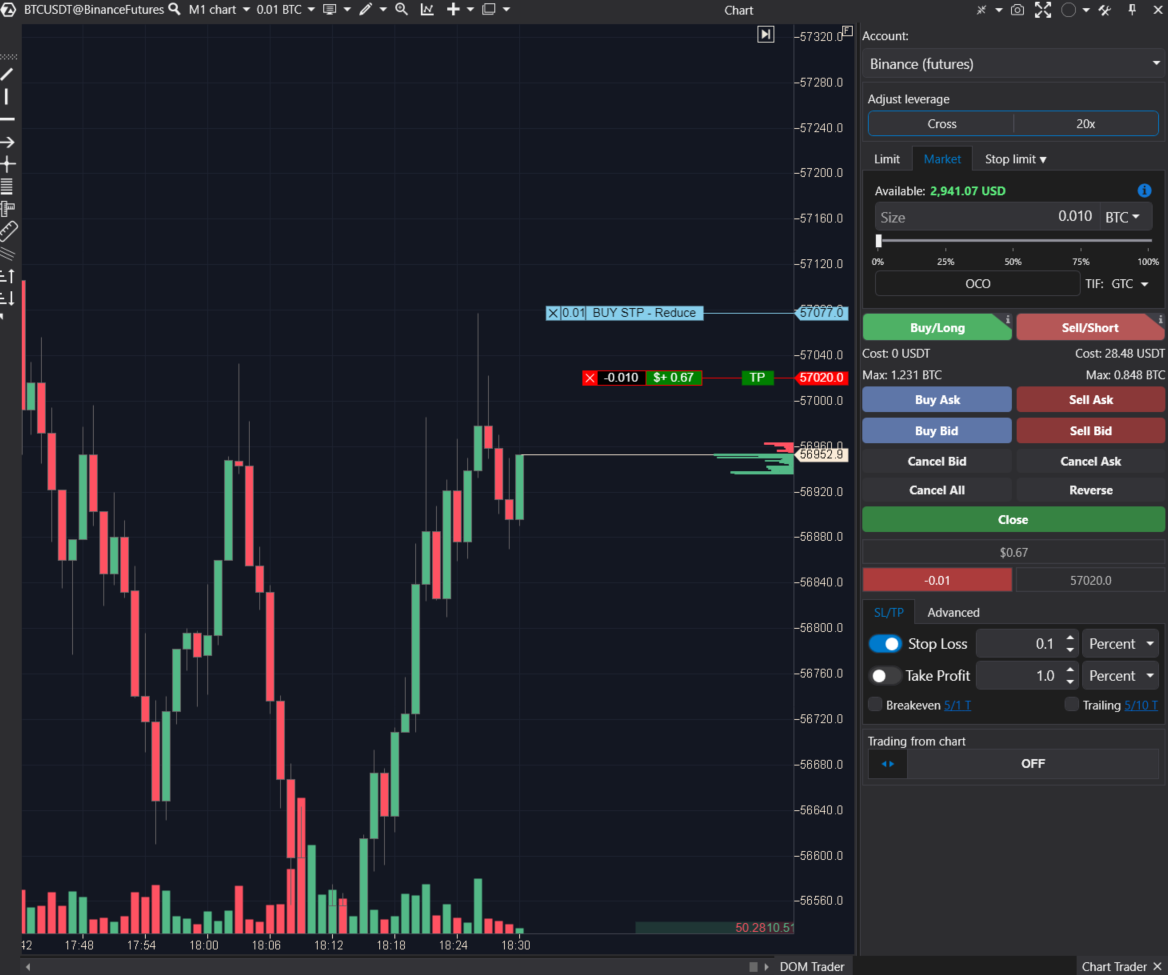
In another scenario, if a trader opens a position with an automatic stop-loss set at 1%, but later decides to reduce the stop to 0.5%, they can change the value in the settings and click Apply. ATAS will immediately adjust the existing protective stop-loss to a closer level.
Pros:
- you can set stop-loss and take-profit orders automatically;
- you can configure setting stop-loss and take-profit orders using values in percentages, ticks, or currency;
- you can adjust the balance between stop and take;
- you can configure stop-loss and take-profit orders independently. For instance, a strict stop will be automatically set to a predefined risk value for a trade, while a take-profit can be manually adjusted based on market conditions.
Cons:
- High market volatility or setting stops and takes too close may result in them triggering immediately after being set.
Breakeven Strategy
This exit strategy involves activating an option to move the stop-loss to the position’s opening level if the price moves a specified distance in the desired direction.
The implementation of this strategy is expected to make the deposit growth curve smoother. On the other hand, it can be disappointing if the price hits the breakeven point and then continues to move in the initially predicted direction.
Simply put, here is how it works:
- The trader buys an asset at $100, setting a stop at $99. The worst-case scenario for them is losing $1.
- The asset rises to $102. The trader moves the stop to the entry level = $100. Now, the worst-case scenario for them is breaking even, but there is no risk of loss (excluding commissions, slippage, and gaps).
To implement a trading strategy with automatic break-even, you need to:
- activate the corresponding option (1);
- adjust the Breakeven and Offset parameters;
- apply the settings (2).
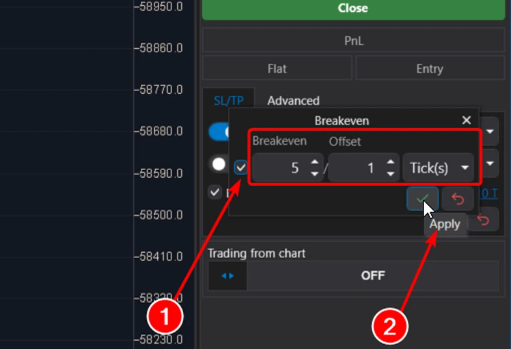
The Breakeven parameter sets a trigger for moving the stop-loss to a specified level. It can be set in ticks or percentages.
By default, the value is set to 5 ticks. This means that if the price moves by 5 ticks in the desired direction, the stop-loss will be moved.
The Offset parameter determines the break-even level to which the stop-loss will be moved.
It can be set in ticks or percentages.
For example, if Offset = 0, the stop will be moved precisely to the opening price.
If Offset = 1 Tick (by default), then the stop will be moved 1 tick above the opening price for long positions or 1 tick below the opening price for short positions.
Example. ES market, E-mini S&P-500 futures.

Initially, a long position was opened with a stop-loss, but when the price moved up by 5 ticks, the stop-loss order was moved one tick above the opening price (technically, the previous one was canceled, and a new one was set). This moment is precisely captured in the screenshot.
An important point: For the breakeven function to work correctly, it is necessary to initially place and configure the stop-loss. Otherwise, what will be moved to breakeven?
- Pros of breakeven: it reduces psychological pressure on the trader, partially protects capital, helps smooth out the growth curve.
- Cons: it may lead to prematurely closing trades that could have potentially been profitable.
Trailing Stop Strategy
This exit strategy is based on a stop-loss that automatically follows the position:
- if a long position is opened, the stop-loss is progressively raised as the price increases;
- if a short position is opened, the stop-loss is progressively lowered as the price decreases.
For example, a trader buys an asset at $100, initially setting the stop-loss at $93. The settings are as follows: Trailing Stop = 10, Trailing Step = 5.
When the price reaches or exceeds $110, the Stop Loss order will be moved to $98. Next, when the price reaches $120, the Stop order will be moved to $103, and so on.
It is assumed that the trailing stop helps the trader trade more effectively with the trend and save effort. While the momentum is developing, the profit grows. On the other hand, the position may close during a correction – especially if the trailing stop closely follows the price.
To use the trailing feature, you need to:
- activate the function by checking the box (1);
- adjust the Stop and Step parameters;
- click Apply (2) to use the settings.
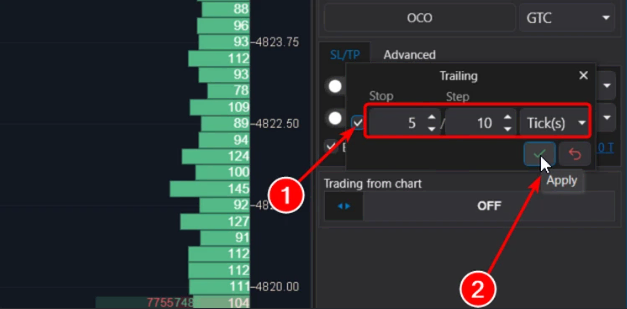
Stop (specified in ticks or percentages) serves as a trigger to indicate the distance the price should move in the desired direction. After this, the stop-loss will be moved.
Step (also specified in ticks or percentages) denotes the distance by which the stop loss will be moved.
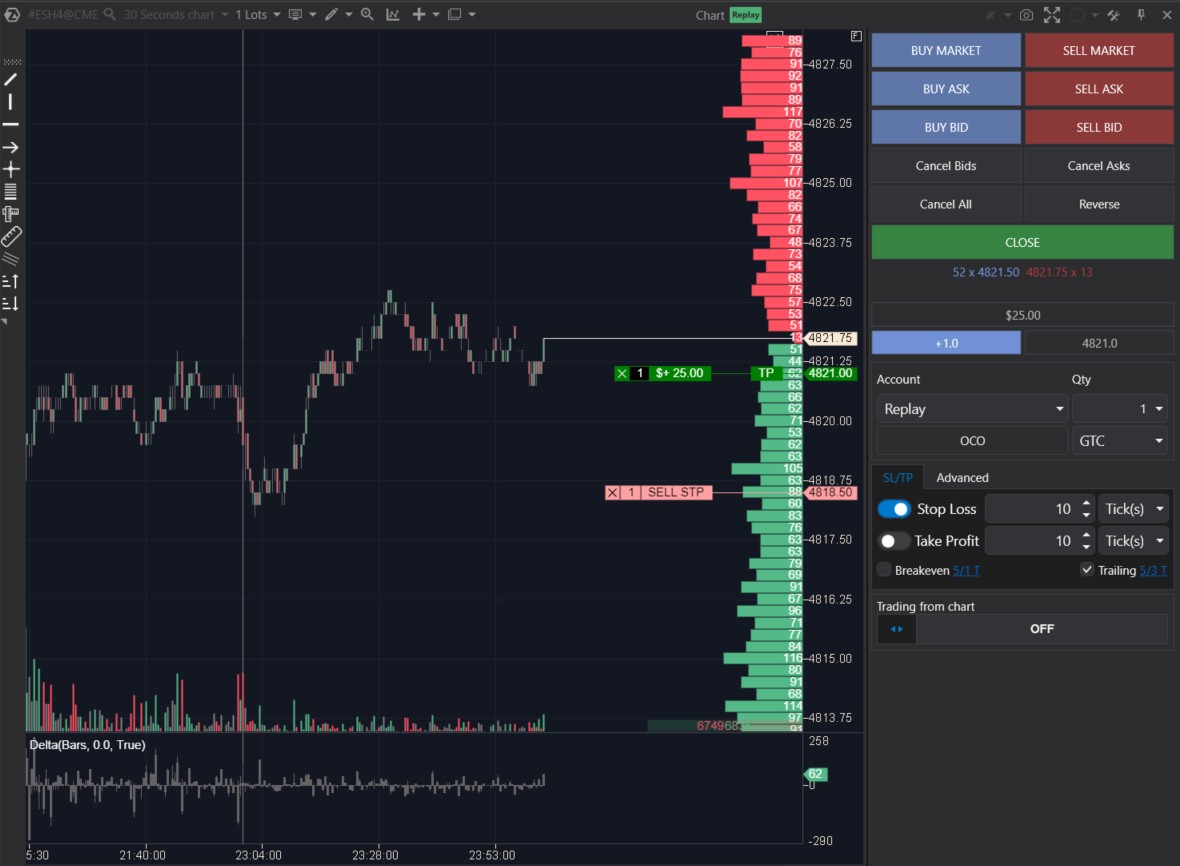
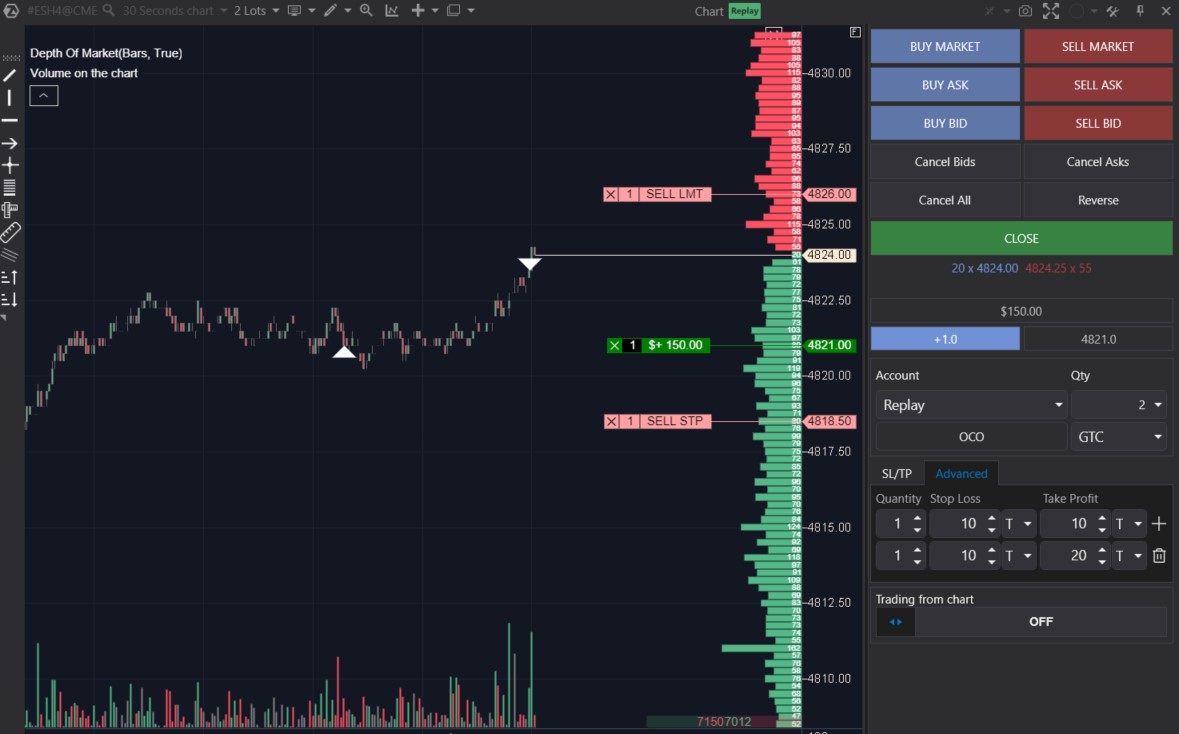
For example, let’s consider the E-mini S&P-500 futures market. Let’s see step by step how the trailing feature will work with these settings: Trailing Stop = 5 ticks, Trailing Step = 3 ticks.
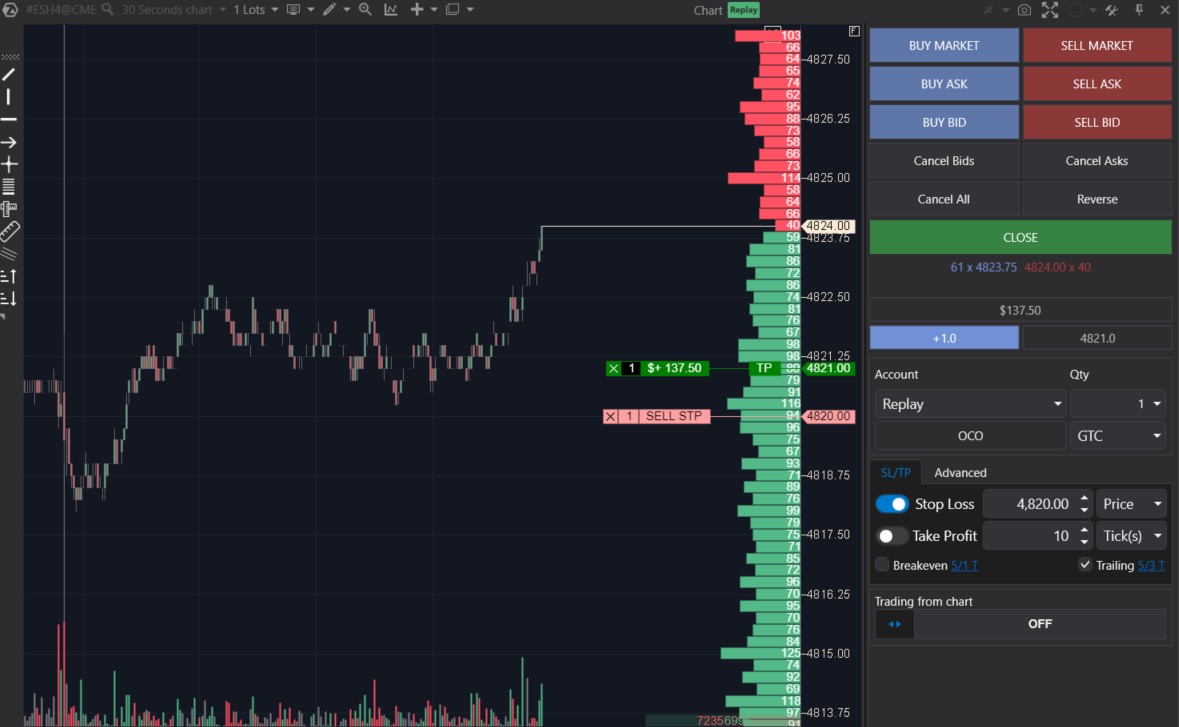
Stage 1. We open a long position at 4821 with a stop loss set at 10 ticks (automatically placed at 4818.50, as the tick size on this market is 0.25 points).
Stage 2. As the price moved up by 5 ticks, the stop loss was adjusted by 3 ticks – specifically to the 4819.25 level (note that after the first triggering of the trailing stop, the stop loss value changed – instead of being 10 ticks, the stop loss is now indicated as a specific price level of 4819.25).
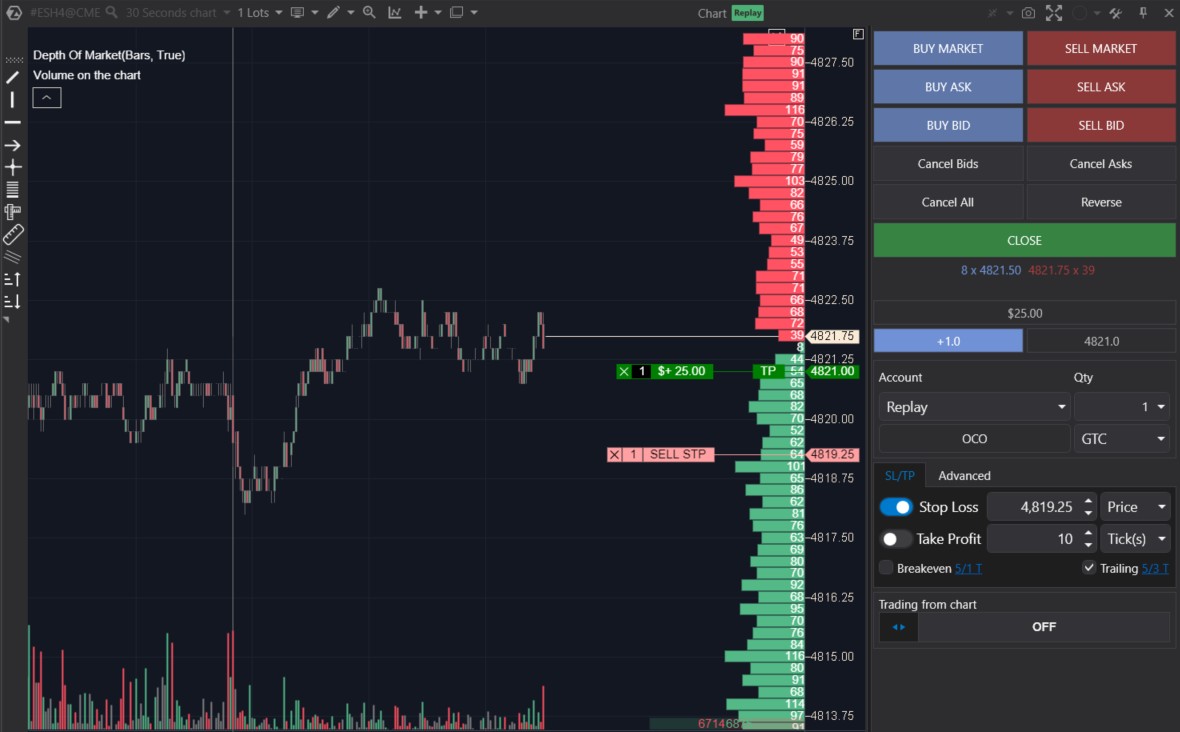
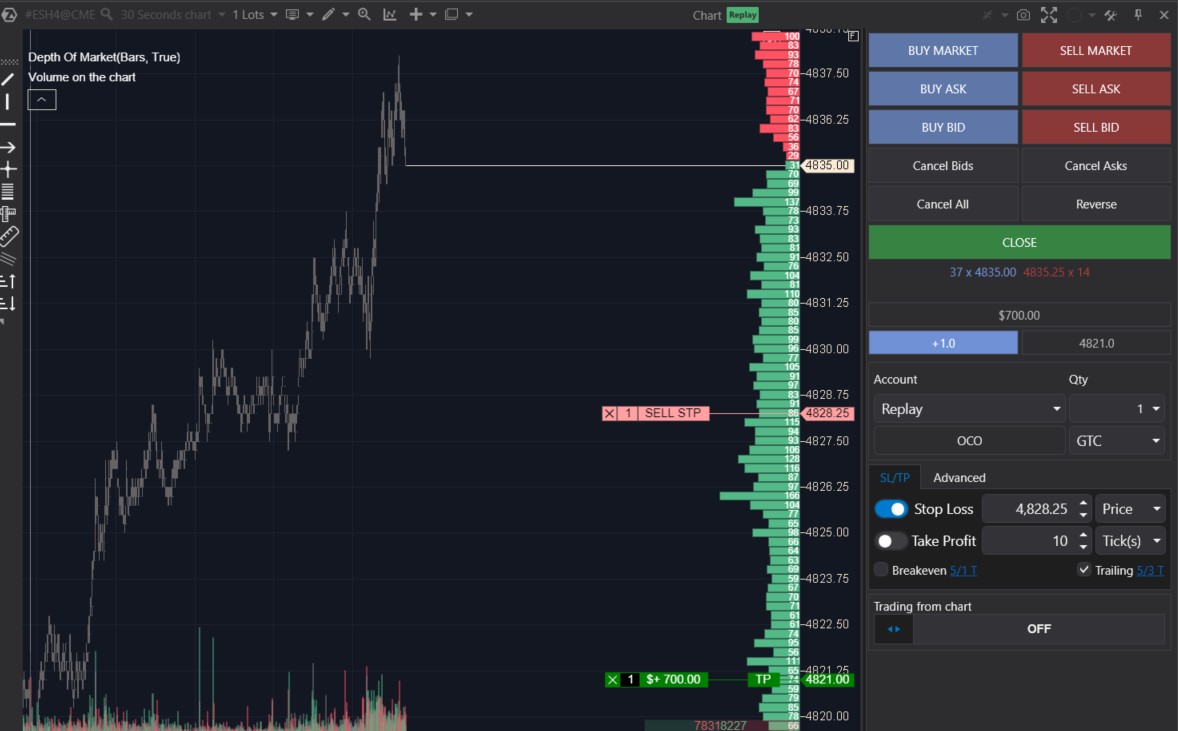
Stage 3. The price continues to rise. The second automatic adjustment of the stop loss occurs. Instead of the initial risk of 10 ticks, the risk is now reduced to 4 ticks.
Assuming the process is clear, let’s skip some intermediate stages to see how the position closes. The screenshot below indicates a significant bullish momentum before bears became active.
During this process, the trailing function moved the stop-loss over a considerable distance. However, the activation of bearish sentiment led to the closing of the long position:
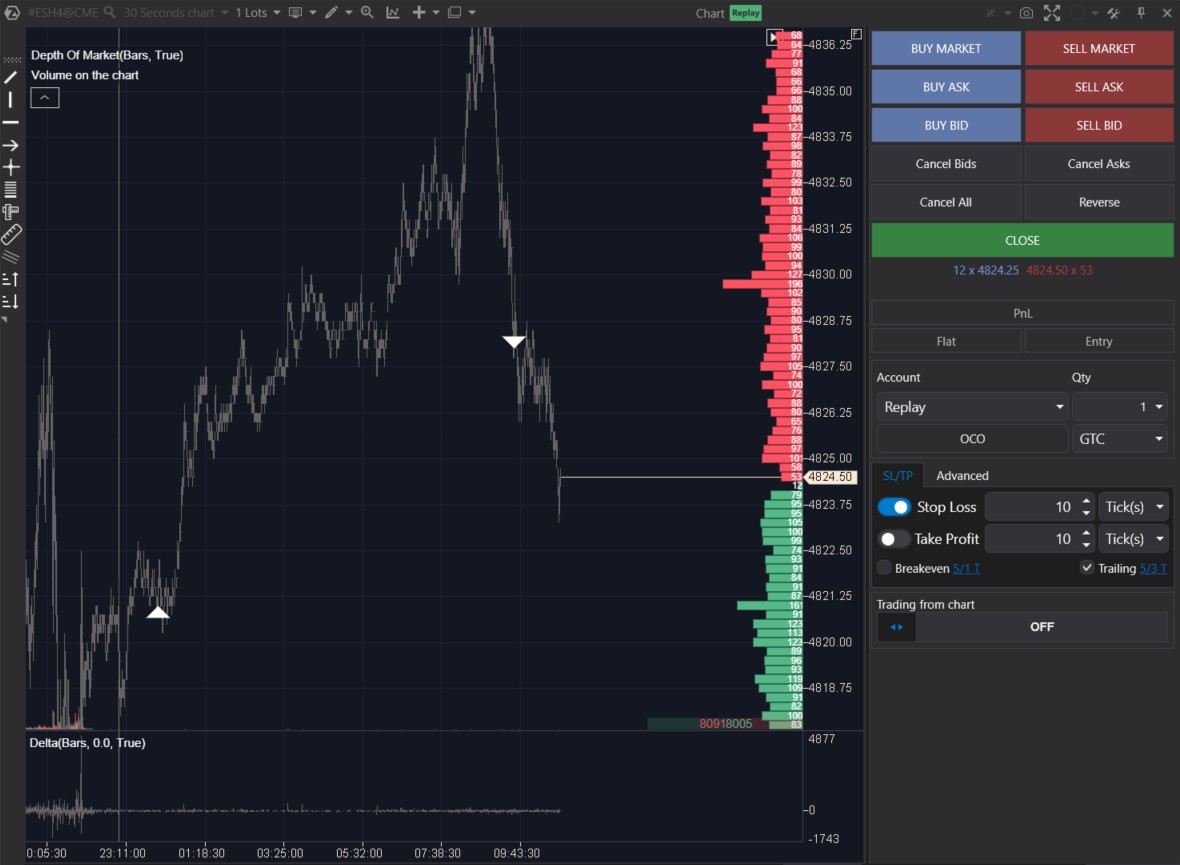
The white triangles indicate the moments of buying and selling.
- Pros of trailing: it automatically follows the price, protecting profits; it operates in real-time mode and closes the position when the market trend changes.
- Cons: it may be triggered during a correction if it follows the price too closely; it may lead to significant missed profits.
Closing a position via trailing often comes with some disappointment – ‘I should have closed earlier, then there would have been more profit!’ But keep in mind that the primary function of trailing is not to take profit (that is what the take-profit is for), but to gradually reduce risks if the price moves in the desired direction.
Partial Position Closing
Let’s explore the functionality located on the Advanced tab. Here, you can configure partial position closing.
This feature can be useful in many cases:
- for instance, a trader opens a long position;
- sets a fixed stop-loss at a level where the price convincingly proves the fallacy of their reasoning;
- and for take-profit, the trader has 2 levels – let’s call them ‘TP1 – conservative’ (closer) and ‘TP2 – optimistic’ (farther, higher).
Now, you need to set up automatic:
- closing of 50% of the position at the TP1 level,
- and the remaining 50% at the TP2 level.
Here is how to do it using the functionality available on the Advanced tab.
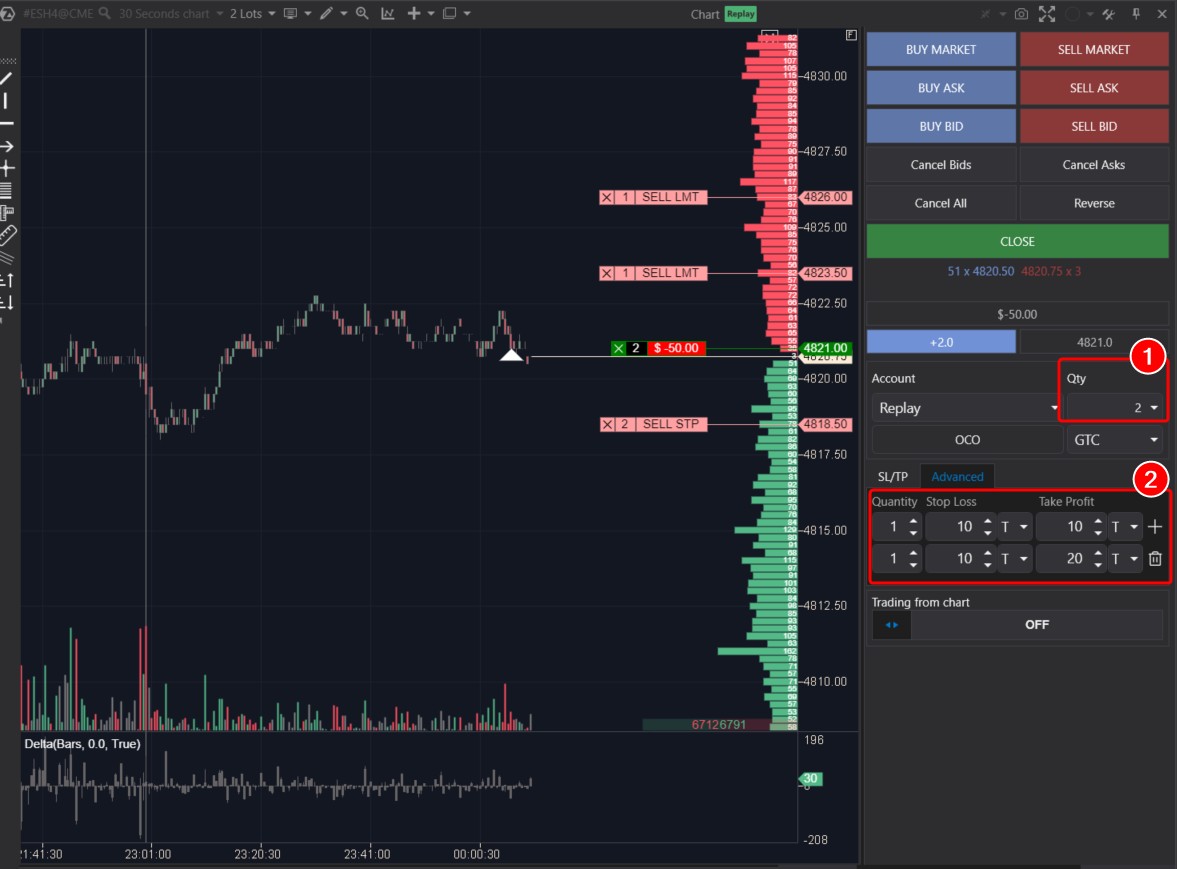
- First, you need to specify that the volume of the opened position (1) will be equal to two contracts.
- Then, in the Advanced block, you need to add a layer by clicking on the plus sign. Then the first layer will be responsible for closing half of the position at TP1, and the second one for closing at TP2.
- Make sure that all settings are correct and click on the confirming green checkmark.
When a long position of 2 contracts is initiated, the take profits and stop losses specified in the settings on the Advanced tab will be automatically applied – as depicted in the screenshot above.
When the price reaches the TP1 level, partial profit-taking occurs:
It is important to ensure that the protective layers on the Advanced tab fully safeguard the volume of open positions (unless intentionally desired otherwise).
- Pros of Advanced protective layers: automation + maximum flexibility, allowing gradual position reduction depending on where the price is heading.
- Cons: high risk of human error – especially if the position is split into a large number of parts.
By the way, to help users track open positions in different markets, ATAS has a Positions window. To open it, click on the corresponding button in the main menu or select the Positions option by clicking on the plus sign at the bottom as shown in the screenshot.
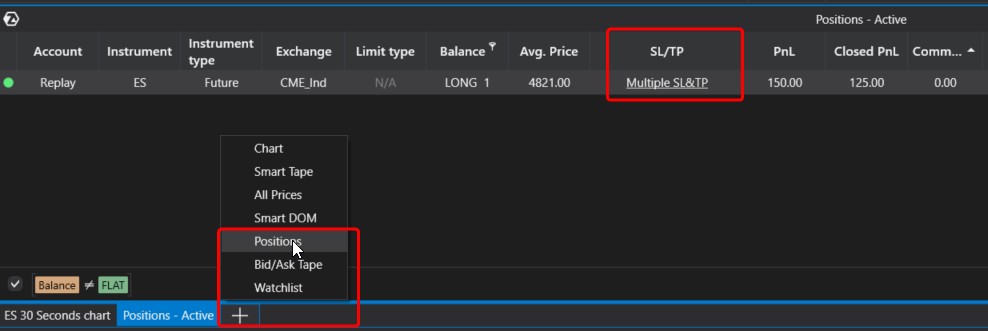
In the Positions window, there is a special column for managing SL and TP levels. Check out how easy it will be to use.
Pros and Cons of Exit Strategies
What are the pros and cons of the discussed capital protection measures related to setting stop-losses, trailing stops, breakeven levels, and take-profits?
Pros:
- Protection. The main advantage is that exit strategies prevent the worst-case scenario from occurring.
- Systematic approach. They help better manage and control the trading process, optimizing SL and TP levels.
- Psychological impact. Stop-loss orders help maintain composure, knowing that capital is protected in adverse situations.
Cons:
- Exit strategies tend to limit profit potential. If a stop-loss is triggered too early (e.g., due to volatility spikes), the trader may miss out on the intended part of the trend.
- Subjectivity. Determining levels for setting stop-loss orders involves additional analysis and decision-making, which can be prone to errors.
- Psychological pressure. Frequent stop-loss triggers can lead to disappointment and a decrease in confidence, sometimes causing traders to refrain from setting stop-losses altogether.
FAQ
Can a trailing stop and breakeven be used simultaneously?
Technically, it is possible. ATAS will systematically execute commands embedded in both functions as conditions are met. However, it is not entirely logical, so we may recommend choosing one or the other. Otherwise, there is a possibility that with certain settings, these functions may conflict and disrupt the system’s consistency. When using both a trailing stop and breakeven simultaneously, it is important to have a clear understanding of why this is done and how the system will operate under different price behavior scenarios.
Is it necessary to set stop-loss orders?
A position can be opened without a stop-loss. Technically, when a position is opened, it does not have a stop-loss. Setting a protective order is not mandatory, but highly advisable, as it will prevent critical scenarios where capital may be either completely destroyed or irreversibly reduced.
What are mental stop-losses?
This is for experienced traders. They closely monitor the market while keeping in mind the levels of mental stop-losses. When these levels are reached, traders conduct an analysis considering new data and decide what to do next: either manually close (reduce/increase) the position, continue holding, or choose another option. This adds flexibility, eliminates the risk of stop-loss being triggered by a volatility spike, but leaves open the scenario with catastrophic consequences. Use mental stops only when fully aware of everything you are doing.
What are mathematical stop-losses?
In simple terms, this is when a trader sets a stop-loss not based on an extreme point, a level of significant volume, or any other element of the chart, but by using a formula. A simple example is a stop-loss set at 0.1% of the asset’s price from the entry point.
Can stop-loss and take-profit orders be saved when restarting ATAS?
Yes, since the beginning of 2024, SL/TP orders can be saved after restarting the platform.
How to Apply Exit Strategies
Properly applying stop-losses and take-profits can make a significant difference in trading outcomes. Some say that in trading, it is not just about where you enter, but also where you exit – and that is precisely what is determined when using SL and TP.
To start, it is important to assess your risk tolerance, your strategy’s characteristics, and the current market conditions. Trading is not a one-size-fits-all method, so every trader needs to find their own approach that aligns with their style, knowledge, and preferences.
To quickly learn how to fully use the exit strategies available in the ATAS platform, and to assess how they affect your performance, launch the ATAS Market Replay. It is an integrated simulator for traders. Analyzing statistics for the Replay account will help you find an acceptable balance between risk and potential profit without losing capital. Gain valuable experience in setting stop-losses and take-profits as if trading were happening in real time.
Conclusions
When it comes to risk management, it is generally advised not to stake more than 2% of your total deposit on any single trade. However, a balance between risk and potential reward should ideally range from 1:2 to 1:3 or even higher.
To effectively control risks and secure profits, ATAS offers exit strategies. These are tailored to provide users with flexibility, convenience, and help them maintain control over their portfolios, avoiding emotional decisions that could result in substantial losses.
Download ATAS, professional software for working with exchange volumes. It is free. During the trial period, you will get full access to the platform’s tools to experiment with horizontal and other volumes. Moreover, you can continue using the program for free even after the 14-day trial period is over, whether it is for cryptocurrency trading and/or learning, conducting market analysis.
Do not miss the next article on our blog. Subscribe to our YouTube channel, follow us on Facebook, Instagram, Telegram, or X, where we publish the latest ATAS news.
Information in this article cannot be perceived as a call for investing or buying/selling of any asset on the exchange. All situations, discussed in the article, are provided with the purpose of getting acquainted with the functionality and advantages of the ATAS platform.